Friday 30 July 2021

How to upgrade Apex 20.2 to 21.2 and get Database Actions on-premise.

 This howto is based on my Oracle Developer VM project. To get from the previous Apex version 20.2 to 21.2 is a two step procedure. Install 21.1 over 20.2 and then add Patch Set Bundle 32598392 on top.

Double check the previous version. If you have followed my Oracle Developer VM series, it should be 20.2. Then
  • Download Apex 21.1 and the PSU from apex.oracle.com
  • Unpack apex_21.1.zip to a new directory
  • Change to the new apex directory
According to the Oracle documentation, the database needs to be shut down, then the application server (ORDS in our case) needs also to be shut down, then the database can be restarted. As I use my VM as a single user, I leave the database running. According to Dimitri Gielis Blog, even the ORDS could be left running, but I shut down ORDS in this example.
Connect to the PDB as sys

@apexins.sql SYSAUX SYSAUX TEMP /i/

Run the Apex installer as like shown in the documentation.
After about 15 minutes that should be done.

[oracle@orcldevvm-ol8 apex]$ cd /u01/apex
[oracle@orcldevvm-ol8 apex]$ mv images images.20.2
[oracle@orcldevvm-ol8 apex]$ cp -R /u01/patches/apex/images/ .

As the documentation reads, we need to copy the images directory to the Apex installation directory. I prefer to keep the old data for a while, though this should not be necessary.
Check the Apex Version.
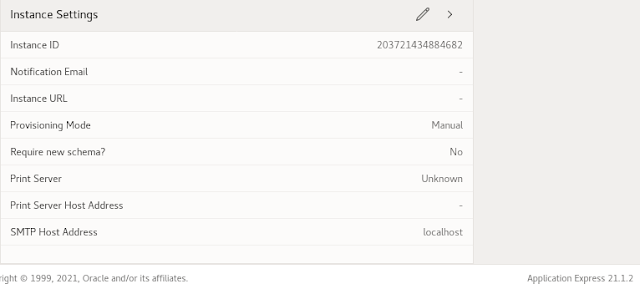
If you want to double-check, startup ORDS and login to the internal workspace to check the Apex version. It should read 21.1.0 now, so far, so good. Shutdown ORDS again.
The documentation recommends to clean up the old APEX schemas. So we need to get rid of the APEX_200200 schema.

alter session set "_oracle_script"=true;
drop user APEX_200200 cascade;

Because the Apex schemas are administrative users, this can only be run in administrative mode.

cd /u01/patches/
unzip ~/ddrive/Install/Generic/apex-21.2-p32598392_2110_Generic.zip
cd 32598392/

Now get Patch Set Bundle for Oracle APEX 21.1, unzip it and change to that directory.
Connect to the PDB and run the installation script catpatch.sql
It took only one and a half minute in my VM.

cp -Rf images/ /u01/apex/

Copy the images directory to the Apex home.
Again check the Apex version.

Get the latest ORDS software from the download site and unpack it to the ords installation directory (eg. /u01/ords). Go to that directory and according to the documentation, run the update with
 
java -jar ords.war install advanced

Enter the correct location of the configuration data from the previous installation, in my case /u01/ords/params/ . The rest is just entering passwords and go with the defaults.

After restarting the ORDS, the new version number should show up on the Apex Web-UI.
Also go to http://localhost:8080/ords/sql-developer and check that you now have the Database Actions instead of SQLDeveloper Web, which is basically the same but offers more functionality.

Monday 26 July 2021

Out-of-Place updating the Developer VM Oracle Database to 19.11

I have made a newer version of this post covering 19.12. Though this post is still valid, I made some additional hints to the new one, so better go directly to Out-of-Place updating the Developer VM Oracle Database to 19.12.

---8<-----------------------------------------------------------------------------

In my last post "Enabling Blockchain Tables and SQL Table Macros with 19.10 Patch for the Developer VM Database", I described how to update the Database via OPatch. Now 19.11. does not have that much new features for developers, this post is only to show how to use out-of-place updating alternatively. Find more information on this on Mike Dietrich's Blog, I will only cover what I need to update the Developer VM.

Create a new directory for the new database home, in my case

mkdir /u01/app/oracle/product/19.11.0/dbhome_2

As for the first installation, get the Oracle Database 19c 19.3.0 Base Release and unpack it to that directory. Create a separate directory for the patch like

mkdir /u01/app/oracle/patches/32545013

Get patch #32545013 for the 19.11 RU and unpack it to that directory. That needs at least OPatch 12.2.0.1.24. Get the latest via Patch 6880880 (which is .25 at the time of writing). Rename the OPatch directory to something like OPatch.old, create a new OPatch directory and unzip Patch 6880880 to that.

As we are running OEL 8.x, we need to give the installer a little hint

export CV_ASSUME_DISTID=OEL7.8

Now we can go to the newly created ORACLE_HOME and run the installer. Better unset all variables pointing to the old home.

unset ORABASE_EXEC
unset ORACLE_HOME
unset ORAHOME
cd /u01/app/oracle/product/19.11.0/dbhome_2
./runInstaller -applyRU /u01/app/oracle/patches/32545013/

This will apply the 19.11 RU during the install. If  you need any specific one-off patches, these can be applied using the "-applyOneOffs" option, see Mike Dietrich's Blog. Click through the installer and choose only to install the software without creating a new database.

After the installer has finished, modify /etc/oratab to point to the new ORACLE_HOME

Copy the contents from /u01/app/oracle/product/19.0.0/dbhome_1/dbs to /u01/app/oracle/product/19.11.0/dbhome_2/dbs .
Change the ORACLE_HOME variable in .bashrc to the new home. Start a new terminal and double check the environment variables.
Start the listener and the database. Finally run the data patch.

cd $ORACLE_HOME/OPatch
./datapatch -verbose

Have fun with 19.11.