Showing posts with label development. Show all posts

Wednesday, 3 June 2026

Installing APEX on Oracle Database Base Service

This is Part 3 of my  Oracle Database Developer OCI Environment series.

Download APEX
On the database machine, get the latest APEX release from https://www.oracle.com/tools/downloads/apex-downloads/
Download the ‘All Languages’ package or use wget, rename the apex folder to append the version number and create a symlink apex to that folder.

cd /u01
wget -P /tmp https://download.oracle.com/otn_software/apex/apex-latest.zip
unzip -d /tmp /tmp/apex-latest.zip
mv /tmp/apex apex-26-1
ln -sfn apex-26-1 apex

If ORDS is planned to run on a separate machine, repeat those steps on the ORDS machine, as the static files from the apex directory are also required on the ORDS machine.

Run APEX installer

From the apex directory on the database machine, run the APEX installer (change tablespaces according to your standards). The user SYS is mandatory, other users are not supported for running the APEX installation (https://apexapps.oracle.com/apex/r/apex_pm/ideas/details?idea=FR-3902&session=130781358621911).
cd /u01/apex

sql sys/<password>@orclpdb as sysdba @apexins sysaux sysaux temp /i/

or

export ORACLE_PDB_SID=orclpdb
sql / as sysdba @apexins sysaux sysaux temp /i/

Keep the session open. Check the APEX release

select * from apex_release;

Set the APEX Administrator password by running

@apxchpwd.sql

Unlock the APEX_PUBLIC_USER and change his password, which has been randomly set at installation.

alter user apex_public_user identified by oracle account unlock;

Still in the same session, run @apex_rest_config.sql and set both passwords for the APEX_LISTENER user and the APEX_REST_PUBLIC_USER user.

@apex_rest_config.sql

To use web services and for sending email, network services need to be enabled. Copy the following from the documentation and run it.  

BEGIN    
   DBMS_NETWORK_ACL_ADMIN.APPEND_HOST_ACE(
      host => '*',
      ace => xs$ace_type(privilege_list => xs$name_list('connect'),
                         principal_name => 'APEX_230200',
                         principal_type => xs_acl.ptype_db));
END;
/
Install ORDS

First, we need to make some settings. Add the following to .bashrc and source it.

cat >> ~/.bashrc <<EOF
export _JAVA_OPTIONS="-Xms3000M -Xmx3000M"
export ORDS_CONFIG=/u01/ords-config
export ORDS_BASE=/u01/ords
export PATH=\$ORDS_BASE/bin:\$PATH
EOF
. ~/.bashrc    

Download the latest ORDS from https://download.oracle.com/otn_software/java/ords/ords-latest.zip and unzip the contents to your target directory (eg. /u01/ords-24-2 and reflect that in the $ORDS_BASE variable in .bashrc. Create the directories and optionally create a symlink:

cd /u01
mkdir ords-26-1
wget -P /tmp https://download.oracle.com/otn_software/java/ords/ords-latest.zip
unzip -d ords-26-1 /tmp/ords-latest.zip
ln -sfn ords-26-1 ords

Have your static document root folder at hand, or create a dummy document root and a log folder like

mkdir -p $ORDS_CONFIG/global/doc_root
mkdir -p $ORDS_CONFIG/log  

to avoid error messages because the document root folder does not exist.

ORDS requires at least JDK 17, but newer versions will also work. As opc user, install any JDK version 17 or higher eg.

sudo dnf in jdk-25-headless.x86_64
Optional: run ORDS installation without SYS

If you want to install ORDS without SYS AS SYSDBA, a user needs to be prepared for that task, see MOS note 2597045.1 or the ORDS Installation and Configuration Guide 1.4 ORDS Installer Privileges Script.

Create a user to install ORDS and run the script

grant connect, RESOURCE to ordsinstall identified by oracle;
@/u01/ords/scripts/installer/ords_installer_privileges.sql ordsinstall 

Mind the lines regarding APEX at the end of the script execution:

grant select on APEX_230200.WWV_FLOW_RT$MODULES to "ORDSINSTALL" with grant option;
grant select on APEX_230200.WWV_FLOW_POOL_CONFIG to "ORDSINSTALL" with grant option; 

As these explicit target the give APEX version, these need to be rerun with every new installed APEX version. But installation of a new APEX version requires SYSDBA rights anyways.

Run the ORDS installer

Either use the interactive installation or configure every parameter on the command line.

Interactive ORDS installation

run

ords install --interactive

The ORDS installation comes up with a menu


If ORDS should be installed without SYS, choose 1 and enter your given user from the previous chapter.

Select 3 and set a password for the ORDS_PUBLIC_USER .

Select 9 and set the APEX static resources location to something like /u01/apex/images/ .

Then continue by choosing A.

ORDS non-interactive silent installation

Alternatively, configure ORDS via command line parameters like shown below. Create a file with the passwords for the ordsinstall and ORDS_PUBLIC_USER passwords and pipe it into the command or if you do not want to use a password file, just enter the parameters when the installer starts. There will be no visible prompt, but it is there. Just type the password for SYS or ordsadmin, hit <Return>, enter the Password for apex_public_user, hit <Return> again and you are done. Some examples:

Basic connection with ORDS install user and interactive password entry

ords install --db-hostname localhost --db-port 1521 
    --db-servicename db26pdb.subxxxx.vcndb.oraclevcn.com --feature-sdw true
    --log-folder $ORDS_CONFIG/log --admin-user ordsinstall --gateway-mode proxied
    --    gateway-user APEX_PUBLIC_USER --proxy-user --password-stdin

Basic connection with SYS and password file

ords install --db-hostname localhost --db-port 1521 --db-servicename db26pdb.subxxxx.vcndb.oraevcn.com 
    --feature-sdw true --log-folder $ORDS_CONFIG/log --admin-user sys --gateway-mode proxied
    --gateway-user APEX_PUBLIC_USER --proxy-user --password-stdin stdin < ~/password.txt

TNS connection with SYS and password file

ords --java-options "-DuseOracleHome=true" install --db-tns-dir $ORACLE_HOME/network/admin 
    --feature-sdw true --db-tns-alias orclpdb --admin-user sys --gateway-mode proxied
    --gateway-user APEX_PUBLIC_USER --bequeath-connect --log-folder /u01/ords-config/log
    --proxy-user --password-stdin < ~/password.txt

The non-interactive installation does not set the static resources location, so add this with

ords config set standalone.static.path /u01/apex/images/
ords config set standalone.static.context.path /i
ords config set jdbc.MaxLimit 30
ords config set jdbc.InitialLimit 20

If you plan to use the MongoDB-API, also run the following:

ords config set mongo.enabled true
ords config set mongo.access.log $ORDS_CONFIG/log
ords config set mongo.port 27017

Configuring ORDS via command line does not start ORDS afterward, so start ORDS with

ords serve

ORDS should come up without warnings.

Test ORDS connection

For a first try run the following on the same machine

curl -I http://localhost:8080/ords/

To test the connection from any other machine, we need to open the SQLNet port in the firewalls first.
As opc user run

sudo iptables -I INPUT 1 -p tcp --dport 8080 -j ACCEPT
sudo service iptables save
sudo iptables -S | grep 8080

Then we need to add the port to the Security List. As already done with port 1521 in the first chapter, navigate to your VCN and open the Default Security List. Under Ingress Rules, where you already have a rule for port 1521, create a similar rule for port 8080.

So the result should look as follows

Open http://<address>:8080 in a Browser, that should route to the ORDS landing page.

To test SQL Developer Web, we need at least one rest-enabled user. Connect to the orclpdb as SYS. For REST-enabling schemas, the executing user first needs an additional privilege, see MOS-Note 2863257.1

grant inherit privileges on user sys to ords_metadata;

Then run

BEGIN
    ORDS.ENABLE_SCHEMA(p_enabled => TRUE,
                       p_schema => 'HR',
                       p_url_mapping_type => 'BASE_PATH',
                       p_url_mapping_pattern => 'hr',
                       p_auto_rest_auth => FALSE);
    commit;
END;
/

Klick on the ‘Go’ button below SQL Developer Web and login with hr. That should open the SDW homepage.

Navigate back to the ORDS Landing page or go directly to http://hostname:8080/ords/apex . Login to workspace INTERNAL with user ADMIN and the password you provided at installation. 

That should lead you to the APEX welcome page.

So APEX is up and running.

Tuesday, 13 May 2025

Setup Oracle Base Database Service in OCI

 This is the first step in my The Oracle Database Developer OCI Environment series We begin with setting up the required networking, then the Base Database Service and test the connection.

Create a Virtual Compute Network (VCN)

Navigate to Networking|Virtual Cloud Networks.


In Networking|Virtual Cloud Networks choose Actions|Start VCN Wizard

Select Create VCN with Internet Connectivity and Start VCN Wizard.

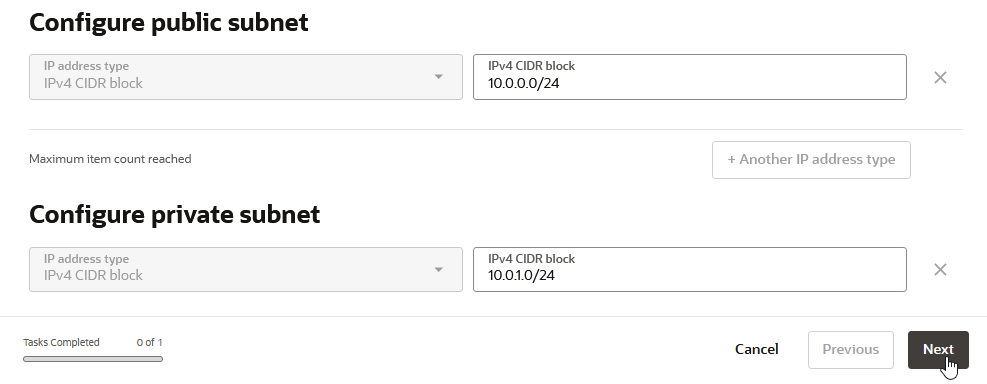
As long as you don’t need something else, mostly go with the defaults. Give it a name, choose your compartment and a CIDR block. 

The public and private subnet address ranges derived from the VCN range should be fine, click Next.
Double check, click Create and View VCN.

Go to the Security tab and click on the Default Security List to edit it.

Go to the Security rules tab and select Add Ingress Rules.

Select your Source CIDR and enter 1521 for the Destination Port Range. Important: leave the Source Port Range empty. Give it a name and finish

The new rule should appear in the list and should look like the one for SSH, except for the name and port.

Create Database Base service

Navigate to Oracle Database|Oracle Base Database Service.

Click on Create DB system.

For most settings, I go with the defaults but YMMV, so adapt the settings to your needs.

Give it a name, the compartment should be pre-selected. Adapt the shape and Edition to your like.

Upload your existing SSH public key or let OCI create you a new key pair. When you download a new key pair, save it to the .ssh folder in your home directory (any OS), for example on my Windows desktop it is 

C:\Users\Arne\.ssh

Choose your preferred license type.


Select the newly created VCN and subnet. We use the public subnet to have SQLNet access via the internet, equivalent to what we would have with a shared Autonomous Database. For a production environment, you should consider creating the database in a private subnet. Enter a hostname prefix

Change the database name, if you don’t like the auto generated one.

As you probably want to use 23ai, click on Change database image.

When you switch on Display all available versions, you will see that 23.7. is the latest image at the time of writing, though 23.8. is already out. Take this image, we will upgrade it later.

Name the PDB and enter your new password. Disable b ackups, if you don’t need them. Then click on Create.

To watch the progress, click on Work requests.

When finished, switch to the Nodes tab and note down the public IP address.

Connect to instance and check database

Connect via ssh

When you have more than one ssh key pair in your .ssh directory, create a config file to assign the keys to different servers. Create or edit your ~/.ssh/config file and add a new entry like this:

Host <your-public-IP-address>
  User "opc"
  IdentityFile c:\Users\<your-user-name>\.ssh\ssh-key-2025-04-23.key

eg.

Replace ssh-key-2025-04-23.key with your key file name.

Next connect to your instance via ssh by running:

ssh opc@<your-public-IP-address>


You should immediately be connected to your virtual machine as user opc. Change user to oracle.
If you get prompted for a password when running the ssh command, most probably something is wrong with your files in the .ssh folder. Double check key pair and config files.

First connect to the database

As user oracle take a first look at your database:

Check the listener first, should look good.

Do a direct connect to the database: sql / as sysdba

Take a look at your PDB’s: sho pdbs

SQLNet connect to your database

Next lets check SQLNet connect.

To find the SQLNet connection information, go to the Databases tab and click on your database.

Click on the DB connection button.

Note down the Easy Connect string for the CDB.

Navigate to Pluggable Database und select your PDB.

Also note down the connect string for the PDB.

From the ssh session connect to the CDB via 

sql system/<password>@<quick-connect-string>


So the database is up and running and we have access via SQLNet.


Thursday, 20 March 2025

How to connect via ssh to Database from the Oracle SQL Developer Extension for VSCode

This post is inspired by a LinkedIn posting from Kris Rice, so kudos to him. Based on that, this post will show how to connect from your Windows host to a VirtualBox VM running Oracle Linux via ssh from the Oracle SQL Developer Extension for VSCode.

First check if the sshd in your VM is running

sudo systemctl status sshd

If you don't already have an ssh key pair on your Windows host, create one via ssh-keygen in the .ssh folder under your home directory

In your Linux VM add the public key from your Windows host by

sudo vi ~oracle/.ssh/authorized_keys

Paste your public key into that file and save it.
Test your connection from the Windows command line.

As you will not be able to choose a username when connecting from VSCode, create an ssh config file on Windows in your .shh folder like this:

Host 192.168.56.11
  User "oracle"
  IdentityFile c:\Users\Arne\.ssh\abruenin-lap

If you don't already have, install the Remote - SSH extension in VSCode
With that extension, you will get the Remote Explorer. It scans your .ssh config file and offers you the ssh hosts that it found.
Click the folder icon next to your connection to 'Connect in New Window...'

In the new server side window, VSCode will recommend you to install the old Oracle Developer Tools for VS Code, though these are marked as deprecated (at least my VSCode did that). Instead install the Oracle SQL Developer Extension for VSCode.
Once installed, you can use SQLDeveloper in the remote ssh window just as you would use it with a direct connection.


Friday, 7 June 2024

Running the Oracle 23ai Autonomous Database Free Container Image

 With the Oracle Database 23ai comes a new deployment option, the free Autonomous Database Free Container Image. It gives developers the option to develop with an Autonomous Database even when not connected to the internet, eg. when travelling. This post shows how to set it up on Oracle Linux 9.4, in my case it is running in a VirtualBox VM on my Windows desktop PC. For details, see the official documentation, this is only meant as a quick runthrough.

Following the documentation, start with

podman machine init 
podman machine set --cpus 4 --memory 8192 
podman machine start 

Maybe it is just my system, but when running podman machine init I get the error qemu-system-x86_64: executable file not found in $PATH. A post on forums.oracle.com described the following solution, which worked on my system:

sudo ln -s /usr/libexec/qemu-kvm /usr/bin/qemu-system-x86_64

The podman command should run now, so follow the steps from the documentation.

podman pull container-registry.oracle.com/database/adb-free:latest-23ai
podman images container-registry.oracle.com/database/adb-free:latest-23ai

That image should show up on your system:
It is important to choose a password which is compliant with the images policy "The ADMIN_PASSWORD must be between 12 and 30 characters long and must include at least one uppercase letter, one lowercase letter, and one numeric".
Choosing a too simple password results in a runtime error, check with podman logs adb-free.
Then start a container with that image, in my case an ATP instance. 

podman run -d \
-p 1521:1522 \
-p 1522:1522 \
-p 8443:8443 \
-p 27017:27017 \
-e WORKLOAD_TYPE='ATP' \
-e WALLET_PASSWORD=*** \
-e ADMIN_PASSWORD=*** \
--cap-add SYS_ADMIN \
--device /dev/fuse \
--name adb-free \
container-registry.oracle.com/database/adb-free:latest-23ai

If nothing went wrong, you should see the container running.
So let's try some stuff. First open Database Actions by browsing https://localhost:8443/ords/sql-developer (and accept the self signed certificate), login with admin and your super secure password from above.
Also APEX works ootb, just login again with your password from above.
To access the ADB from outside with your favorite tooling, copy the wallet from to image to a folder. For SQLDeveloper, we need it as a zip.

podman cp adb-free:/u01/app/oracle/wallets/tls_wallet ~/tls_wallet
zip adb-free-wallet.zip tls_wallet/*

Use that wallet zip file in your tool of choice, in my case VSCodium with the Oracle SQL Developer Extension for VSCode.
Welcome to the Oracle 23ai Autonomous Database Free Container Image.
As long as your podman is ready to run and you respect the password compliancy, this is setup within minutes.