Showing posts with label paas. Show all posts

Thursday, 21 January 2021

Connect a local database to Oracle Data Safe with the on-premise adapter

The configuration of the Data Safe on-premise adapter requires just a few easy steps. First login into the OCI console.
Open the hamburger menu and click on Data Safe.
As you can see from the message on the top right, Data Safe is already activated for my tenant. If this is not the case for your tenant, activate Data Safe first. 
Then click on On Premises Connectors on the left pane.
Click on Create On-Premises Connector.
Give it a name, optionally a description, and click the create button.
The page already tells you, what to do next. Click the button to download the install bundle to your target machine.
Without this password, the next steps won't work. For now, we are done in the OCI console.

Unpack the install bundle zip to your destination location, in my case /u01/DS-on-prem-connector/ 
According to the README, we have the following requirements:

   2a. Software Prerequisites
       1. Oracle Linux 7 or higher
       2. Python 3.5 or higher
          -- with following dependent modules
             -- configparser
             -- zlib
       3. Valid JDK Home(JAVA_HOME)
          -- Version 7 or higher

So if any of these are missing in your environment, this is the time to fix them. Then run the setup-script as documented in the README.

python3 setup.py install --connector-port=1560

This should result in the following
Don't care too much abouit the 'not reachable' message, that might just be a timing issue.

Before a database can be registered with Data Safe, a user with specific rights is needed. Follow the official documentation to create such user and grant the rights that you need.
Go back to your OCI console. If the icon became green and it reads active, everything went fine. Go up one level in the OCI console and click on Service Console. Then under Targets click on Register.
For Target Type choose Oracle On-Premises Database and for Connectivity Option choose On-Premises-Connector, then below select the connector you have just created. If your target machine has several IP addresses, make sure to choose the one that the Listener is listening on (check with lsnrctl stat). Enter the user credentials from the previous steps. Then click Test Connection and after the message 'Test connection is successfull' click on Register Target.
In the Data Safe Service Console under Targets, you should find your newly registered database.
For a simple test run, go to Home/Security Assessement and pick your database. Click on Assess Now, wait for the report to finish and click View Report.
Oh dear, my database has 2 high risk issues. Don't tell anyone ...


Friday, 31 March 2017

Oracle Cloud: create Docker container with Java via CLI

This tutorial demonstrates, how to set up an instance of Oracle Application Container Cloud Service (ACCS, under the hood running Docker) with a pre-configured Java environment via the PaaS Service Manger (PSM) command line interface (CLI).
If you have followed my former postings on this
you should be ready to go when running a Windows client. Whatever OS and editor you are using, the tutorial expects that you have setup your psm, so it speaks to your Oracle Cloud Identity Domain.
The general idea of the Cloud Stack Manager is, that you define your wanted environment in a template first. That environment might consist of several instances and is called a stack. When you got your template, upload it to the Oracle Cloud Stack Manager and create as many instances, as you like.
I have always been a friend of starting with the simplest possible example and don't move on before that is understood and running. So this tutorial shows step-by-step how to set up a stack with a single ACCS Java instance.

1. Create a template

Pick your favorite editor and write your first template. Ideally, the editor supports running shell commands in the background and pipes the output to an editor window. 
Here is my template:

 1
 2
 3
 4
 5
 6
 7
 8
 9
10
11
12
13
14
15
16
17
18
19
20
21
22
23
24
25
26
27
28
29
30
31
32
33
34
35
36
37
38
39
---
    template:
        templateName: Simple-Java-Template
        templateVersion: 42.0
        templateDescription: "Hello Template World"
        parameters:
            containerName:
                label: Container Name
                description: Please enter the name of the Java Container
                type: string
                mandatory: true
                sensitive: false
                minLength: 2
                allowedPattern: "[a-zA-Z]*"
            parameter1:
                label: Parameter1
                description: Some Parameter 1
                type: string
                mandatory: false
                sensitive: false
            parameter2:
                label: Parameter2
                description: Some Parameter 2
                type: string
                mandatory: false
                sensitive: false        
        parameterGroups:
          - label: Mandatory Parameters
            parameters: 
              - containerName
          - label: Some Other Parameters
            parameters: [ parameter1, parameter2 ]
        resources:
            abContainer: 
                type: apaas
                parameters:
                    name: { "Fn::GetParam":containerName }
                    subscription: MONTHLY
                    runtime: Java

The first general section is quite obvious: a name, version and description.
Then comes the parameters section. In fact, I only need one parameter to ask for the name of the container. But to demonstrate the Parameter Groups, I added two unused parameters.
The parameterGroups section covers the groups Mandatory Parameters and Some Other Parameters. These groups are for the UI to visually group the parameters.
The resources section is where the wanted resources are listed with their parameters. Here we only have one ACCS instance with Java taste. For the name parameter, we insert the value of the containerName parameter by using Fn::GetParam. The only other mandatory parameter is the chosen subscription.

2. Import the template

Now that we have a template, we are ready to go. It is a good idea to validate the template first by using PSM with the following line:

psm stack validate-template -f Simple-Java-Template.yaml

The output should look like this (from Notepad++)


As everything is OK with the template, it can be imported by using


D:\programme\python\Scripts\psm.cmd stack import-template -f "D:\Project\PSM\Simple-Java-Template.yaml"

and the output should look like this:


Switch to the UI to double check that the template is available in the Cloud Stack Manager


Of course this can also be done using the PSM command


psm stack list-templates

but the result gets quite a bit long. Just the relevant first lines:


3. Create an instance from the template

Now that we have a valid template imported into Cloud Stack Manager, we can start creating instances based on that.

When creating an instance via the UI, the following dialog comes up

That shows what the parameter groups are good for: they group the parameters.

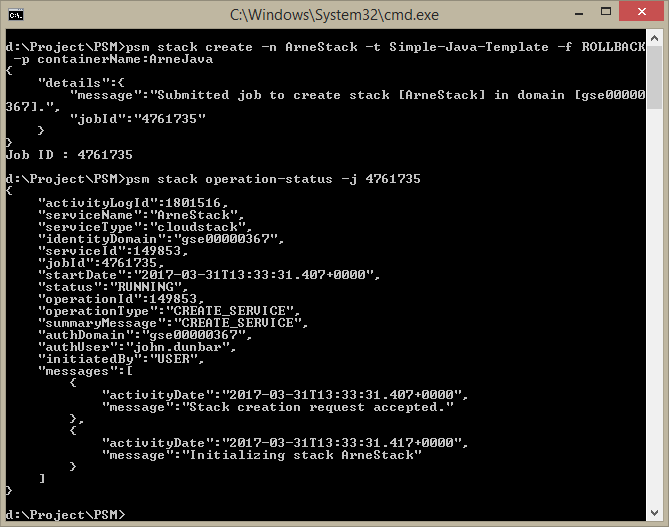
But this tutorial is about using the command line. Create an instance using the PSM via

psm stack create -n ArneStack -t Simple-Java-Template -f ROLLBACK -p containerName:ArneJava

Copy the returned Job ID and check the status via

psm stack operation-status -j 4761735

and the output should look like


The same can be found in the UI when clicking on the status text.

Wait until psm stack operation-status returns something like


{
    "activityDate":"2017-03-31T13:37:31.896+0000",
    "message":"Creation of stack ArneStack successful."
}

Double check by executing


psm stack list

to see your newly created stack listed:


4. Test and delete the instance

Go the the UI and click on the name of the stack. This will bring you to the Stack Overview.

Click on the Application Web URL


That should bring up the test page. So with the instance is up and running this tutorial is finished. Delete the instance with


psm stack delete -n ArneStack

5. More information

Two more complex examples are delivered with your Oracle Cloud subscription, you will find them in the templates section of the Cloud Stack Manager UI. One with a MySQL DB and a PHP container (Oracle-LMP, a LAMP stack without Apache) and one with an Oracle DB and a WebLogic Server (Oracle-JCS-DBCS-Template).

Some Documentation:

Friday, 4 November 2016

Using PaaS Service Manager (PSM) for Oracle Cloud under Windows

With the PaaS Service Manager (PSM), Oracle delivers a command line interface (CLI) for the Oracle Cloud PaaS services. It requires cURL and Phython, which needs to be set up in advance. On Linux systems, this can easily done by using the package manager of your distribution. Under Windows, a few manual steps are required. Unfortunately the official documentation is missing a point. This tutorial will show how it works.
For the installation of cURL and Python for Windows, start with the URL's from the Oracle Documentation 'Performing Prerequisite Tasks for the Command Line Interface' to download and install both tools. The Python installer gives you the option to add Python to the PATH variable, for cURL this has to be done manually in the Windows System Settings.


A quick test with python --version and curl --version should be successful as shown above


Now we need the PSM binaries. Log into your Oracle Cloud services and open the service console of any PaaS service.


Click on your username, then help|Download Center.


Download the PSM from here, which should give you a psmcli.zip. Now here is the point, that is missing in the official documentation. To install psmcli.zip you need pip.exe or pip3.exe, but that is not part of the standard installation. Here is how to get it:


Go to https://pip.pypa.io/en/stable/installing/ and click on get-pip.py. Choose Open with Python.


Wait until the installer windos closes, now you have pip.


It is located in python/Scripts, so unfortunately no in your path. For easy access, you could change your PATH again, or create a shortcut ...


... and move that into your python directory (which should be in the PATH).


Starting pip from anywhere should now return some instructions


Now you can continue with the official documentation, so install psm by running


pip install -U psmcli.zip

from the directory, where you downloaded psm.


Then enter your credentials.


And try psm help, to see if it works.


If psm works, try to query your cloud services, eg.


psm jcs services

As shown above, if anything is set up correctly, the information should be returned, Thats is, psm is ready to use.