Tuesday, 9 June 2020

Oracle Linux 8.2 on VirtualBox - Guest Additions & basic usability settings

This posting is part of my Oracle Database Developer VM Project series. In the last episode, we did a clean installation of Oracle Linux 8.2 on VirtualBox.
In this episode, I will list my personal preferred settings. As always, these are my personal preferences and not necessary the official Oracle recommended settings.
As we need to do some configuration stuff that requires root privileges, start with putting the oracle user into the sudoers group. Fire up a console, become root and give add the oracle user to the wheel group that has the sudoers privilege:

[oracle@localhost ~]$ su -
Password:
[root@localhost ~]$ usermod -aG wheel oracle
[root@localhost ~]$ logout
[oracle@localhost ~]$

As the new group setting won't be effective until the next login, logout of your Gnome environment
Login as oracle again and double check if you are now in the sudoers group. Run the groups command, it should return oracle wheel dba oinstall.
As we are now member of the sudoers, the very first thing I always do is to make sure, that your system is up to date. Having the latest updates installed increases the chance of running seamlessly on VirtualBox a lot. So first run a

sudo yum check-update

And I regularly run into this problem:
Though the network adapters are enabled in VirtualBox, they are disabled in OL by default.
So switch on both network adapters.
As you probably don't want to do this after every reboot, click on Wired Settings below each adapter and check Connect automatically (This could also be done when running the installer, but I usually forget this). Now re-run the sudo yum check-update.
And here we are.
Continue with a yum update to install the listed package updates. Now it is time to get some more comfort by installing the VirtualBox Guest Additions. After successful patching the system, reboot to continue.
For installing the VirtualBox Guest Additions, we need the kernel headers and make. After login, run

dnf install kernel-uek-devel
dnf install make

and you will have the required package.
Important: make sure that you are running VirtualBox 6.1.10 or newer, because there is an issue with the Guest Additions of older versions and OL 8.2. After booting, go to the VirtualBox Devices menu and choose 'Insert Guest Additions CD image...', follow the instructions and reboot.
After reboot, you should be able to enjoy all the comfort from the Guest Additions, so you can move the mouse out of the VBox-Window, Copy&Paste between Host and Guest OS and resize your desktop.
To give the oracle user access to shared file systems, add him to the vboxsf group by editing /etc/group. Log out and in again to make this change active.
Try it with a ls to wherever you mounted your externe folder to, in my case ~oracle/ddrive.
As this is just my development VM with no sensitive data, I prefer to auto-login my oracle user on startup. This can be configured by editing /etc/gdm/custom.conf and adding the following lines

[daemon]
AutomaticLoginEnable = true
AutomaticLogin = oracle

After the next reboot, you should automatically be logged in as oracle.
Same is for the screen lock. As my host OS already locks the screen, I have no need to double that functionality in my VM. It can be disabled in Settings|Privacy|Screen Lock.
If you change your proxy settings regularly, eg. if you sometimes work from a company network and sometimes from a public one, then go to the Software Manager and search and install the Gnome Extension Proxy Switcher. It lets you easily change your settings from the network menu.

This is a matter of taste. I don't like Gnome and the missing window minimize and maximize buttons could lead to clutter on your desktop. But these can be brought back.

sudo dnf install gnome-tweak-tool

Install Gnome Tweaks.

Start it, navigate to the Windows section and re-enable them.

I prefer to have one more extension. Even with screen lock switched off, Gnome 3 comes with something like a screensaver called screen shield, showing your background and a clock. To disable that, another extension is needed.
It can be downloaded from Gnome Extensions under https://extensions.gnome.org/extension/672/disable-screen-shield/. To install it from the browser, first install the plugin mentioned on that page and reload it. Then directly enable the extension from your browser.
Now under Extensions I prefer to enable Applications MenuDesktop Icons, Disable screen shield and Window List. This is much closer to the older Gnome versions like in Oracle Linux 7.x and more usable IMHO.

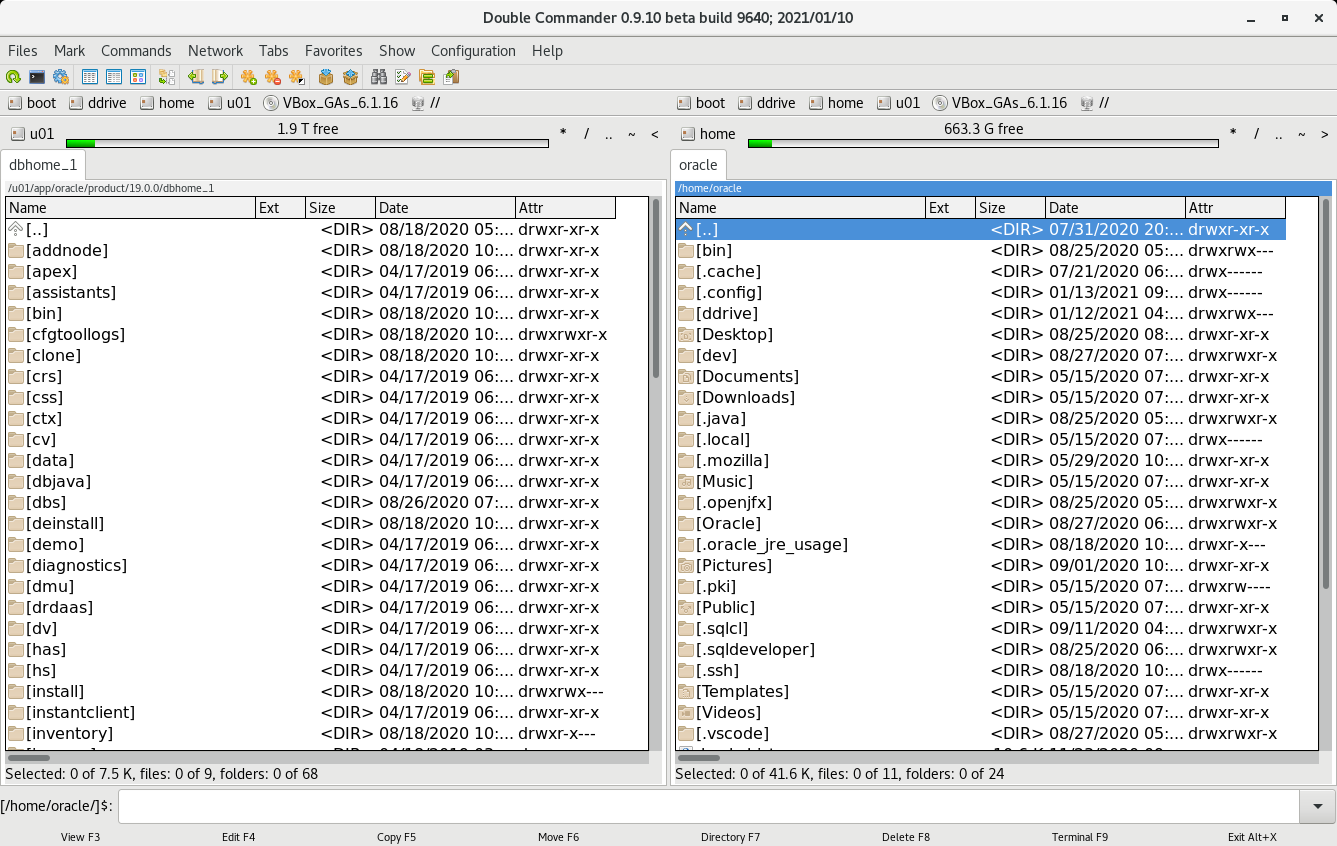
I would also recommend to get a better file manager. I personally prefer Double Commander, get it from SuSE OpenBuild service at https://software.opensuse.org/download.html?project=home%3AAlexx2000&package=doublecmd-gtk.
The EPEL-Repository contains several tools that are not recommended for production usage. So it is not installed by default, but handy for a developer environment. Install it via dnf ...

dnf in oracle-epel-release-el8.x86_64

 and test it with installing htop from the EPEL repository:

dnf in htop

Run htop and it should look like this
By default, Python 3 is installed, but not configure to run. Enable Python 3 with the following:

/usr/sbin/alternatives --config python

So much about my basic usability settings for the DB Developer VM.

Next --> Preparing the Linux VM for Oracle DB installation

Wednesday, 20 May 2020

Installing Oracle Linux 8.2 on Virtualbox

This posting is part of my Oracle Database Developer VM Project series. The resulting VM is intended to be an Oracle DB developer all-in-one VM. For different purposes, other settings might be more appropriate.

Most IT people won't need a guide to install Linux in a VM and skip this part. But if you are new to this, I will give a very detailed step-by-step guide. The settings I use are often my personal preferences. Though I work for Oracle, these settings are not always the officially Oracle recommended settings.

First download and install Oracle VM VirtualBox from https://www.virtualbox.org/wiki/Downloads. It is important to use Version 6.1.10 or newer, because the older ones don't have support for the OL 8.2, the guest additions won't compile according to the changelog. You will also need the Oracle Linux ISO image, which is available from https://www.oracle.com/linux/technologies/oracle-linux-downloads.html, following the link to 'Oracle Software Delivery Cloud'. This is NOT a guide on licensing, so please work through that information yourself.

Start Virtual Box.

Select Machine/New to start with a new VM.
Give it a name and choose Linux and Oracle (64-Bit)
Choose the amount of RAM you can afford
You will need a virtual hard disk
Go with the default VDI file type
As long as you don't have more storage than you need or this is very performance sensitive for you, Dynamically allocated should be fine.
Especially when you are using dynamically allocated, make it large even if you don't need it now. This is so much easier than grow your volume in the future in case you will need it. And it does not cost space on your device now.
Here you are, ready to go. But we need to adjust some settings first, so click on the Settings cog
Shared Clipboard works well for many versions, so I don't see any reason to not enable these (for GUI VM's of course).
We don't need the good old Floppy Disk. I always disable it, though it probably doesn't hurt either.
Give it the cores you have.
A little more Video Memory is usefull. I don't know, if we really need 64 MB. I had some problems in the past with only 16 MB. If you are short on memory, you might try out 32 MB. 
We really don't need audio, and I recently learned that VBox audio might interfere with a Zoom session in your host OS (thanks Sören). So better disable it.
Leave the default NAT adapter, but click on Adapter 2 to add another one.
I prefer to have an additional Host-only Adapter for easy networking between my host and guest.
The USB Controller also sometimes interferes with my host, so better switch it off.
A shared folder with your host can make your life much easier. I prefer to have it auto mounted in my users home directory.
The user interface often gets in my way, so I disable it. When I need the VBox menu, I switch from full screen to windowed and back.
Now virtually insert the Oracle Linux ISO image. Select the empty disk and Choose a disk file...
Locate the previously downloaded OL ISO image on your HDD and open it.
Your DVD controller should display the mounted ISO image like this. We are done here, click OK to close the settings.
Click Start to boot the VM and start the OL setup.
Install Oracle Linux 8.2.0
Even if you choose to change the keyboard layout on the next page (like I do), I recommend to leave the system in English.
In the installation summary, you can change the keyboard layout if you need.
I use a German keyboard.
Now for the important part, choose Installation Destination.
Select the ATA VBOX HARDDISK, which is your .vdi file. Then choose Storage Configuration / Custom.
Click on Click here to create them automatically, so you don't have to start from scratch.
OL comes up with a proposal, that could use some fine tuning. It prefers the xfs file system, which gave me some trouble in the past. Though it has some advantages when running OL on a real server, for a single user VM, ext4 is the easier one to handle. Also 50 GB is not so much for the root file system and swap also could get a little bigger. As /home has more than enough space, the sizes could be adjusted accordingly.
  So my changed layout is 100 GB for root, 16 GB for swap, leave boot untouched and give the rest to home with home and root formatted with ext4.
Click Done and Accept Changes.
Enough storyboarding, let's shoot something. Click Begin Installation.
While setup is running, let's care about the users. Set the root password to your like, then klick on User Creation.
We need at least one user for Oracle, typically named oracle. Give it a password and click on Advanced...
Leave the home directory, but add the groups dba and oinstall, then Save Changes.
Wait for the installer to complete, then click on Reboot.
If you want to use Oracle Linux, Oracle requires you to accept their license. Click on License Information.
Read this carefully. If you choose to accept the license agreement, continue with the next step.
We are almost done. Click on Finish Configuration to do some post installation stuff.
If you want system updates (I bet you do), register the system.
Not sure why we need to choose the input method again. But if you want something other than a US-keyboard then choose the one you want.
 Nah, we don't need Location Services in our VM ...
... neither do we need any online accounts.
Ready to go sounds good, click the large blue box to start.
Welcome to Oracle Linux 8.2 with the new Redwood Design background. Lovely, isn't it? So much for the basic installation steps.

Next -> Oracle Linux 8.2 on VirtualBox - basic usability settings