Tuesday, 13 May 2025

Setup Oracle Base Database Service in OCI

 This is the first step in my The Oracle Database Developer OCI Environment series We begin with setting up the required networking, then the Base Database Service and test the connection.

Create a Virtual Compute Network (VCN)

Navigate to Networking|Virtual Cloud Networks.


In Networking|Virtual Cloud Networks choose Actions|Start VCN Wizard

Select Create VCN with Internet Connectivity and Start VCN Wizard.

As long as you don’t need something else, mostly go with the defaults. Give it a name, choose your compartment and a CIDR block. 
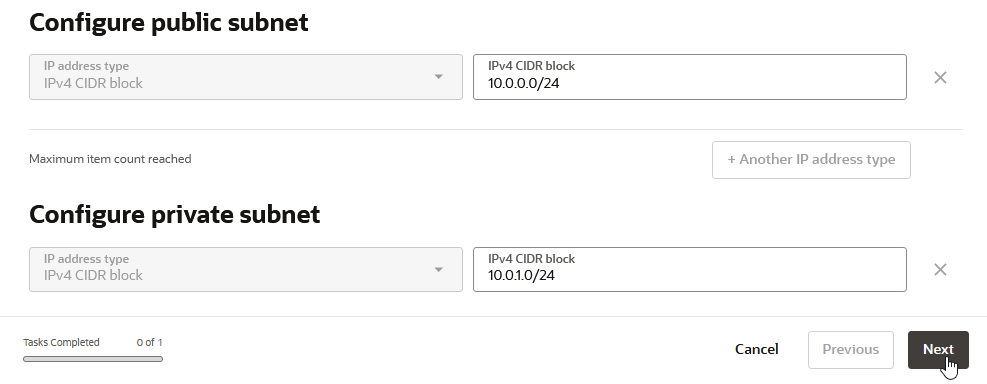
The public and private subnet address ranges derived from the VCN range should be fine, click Next.
Double check, click Create and View VCN.

Go to the Security tab and click on the Default Security List to edit it.

Go to the Security rules tab and select Add Ingress Rules.

Select your Source CIDR and enter 1521 for the Destination Port Range. Important: leave the Source Port Range empty. Give it a name and finish

The new rule should appear in the list and should look like the one for SSH, except for the name and port.

Create Database Base service

Navigate to Oracle Database|Oracle Base Database Service.

Click on Create DB system.

For most settings, I go with the defaults but YMMV, so adapt the settings to your needs.

Give it a name, the compartment should be pre-selected. Adapt the shape and Edition to your like.

Upload your existing SSH public key or let OCI create you a new key pair. When you download a new key pair, save it to the .ssh folder in your home directory (any OS), for example on my Windows desktop it is 

C:\Users\Arne\.ssh

Choose your preferred license type.


Select the newly created VCN and subnet. We use the public subnet to have SQLNet access via the internet, equivalent to what we would have with a shared Autonomous Database. For a production environment, you should consider creating the database in a private subnet. Enter a hostname prefix

Change the database name, if you don’t like the auto generated one.

As you probably want to use 23ai, click on Change database image.

When you switch on Display all available versions, you will see that 23.7. is the latest image at the time of writing, though 23.8. is already out. Take this image, we will upgrade it later.

Name the PDB and enter your new password. Disable b ackups, if you don’t need them. Then click on Create.

To watch the progress, click on Work requests.

When finished, switch to the Nodes tab and note down the public IP address.

Connect to instance and check database

Connect via ssh

When you have more than one ssh key pair in your .ssh directory, create a config file to assign the keys to different servers. Create or edit your ~/.ssh/config file and add a new entry like this:

Host <your-public-IP-address>
  User "opc"
  IdentityFile c:\Users\<your-user-name>\.ssh\ssh-key-2025-04-23.key

eg.

Replace ssh-key-2025-04-23.key with your key file name.

Next connect to your instance via ssh by running:

ssh opc@<your-public-IP-address>


You should immediately be connected to your virtual machine as user opc. Change user to oracle.
If you get prompted for a password when running the ssh command, most probably something is wrong with your files in the .ssh folder. Double check key pair and config files.

First connect to the database

As user oracle take a first look at your database:

Check the listener first, should look good.

Do a direct connect to the database: sql / as sysdba

Take a look at your PDB’s: sho pdbs

SQLNet connect to your database

Next lets check SQLNet connect.

To find the SQLNet connection information, go to the Databases tab and click on your database.

Click on the DB connection button.

Note down the Easy Connect string for the CDB.

Navigate to Pluggable Database und select your PDB.

Also note down the connect string for the PDB.

From the ssh session connect to the CDB via 

sql system/<password>@<quick-connect-string>


So the database is up and running and we have access via SQLNet.


Monday, 12 May 2025

The Oracle Database Developer OCI Environment

This is a step-by-step guide for setting up an Oracle Database Development Environment on OCI. It will use the Base Database Service instead of an Autonomous Database, so an OCI account where a DB Base Service can be set up is required. In addition to the database, all necessary tools like ORDS and APEX will be set up, similar to my 'The Oracle Database Developer VM Project' series. And same as my older series, this is a work-in-progress, continuously updates when I find something new to cover.

Thursday, 8 May 2025

Use your Oracle Athenticator on Android via your Garmin smartwatch

In fact, this is a generic feature of the Garmin integration with Android smartphones. If you use the Oracle Authenticator to log into your Oracle Cloud account, you can use your Android smartphone for two-factor authentication. When logging into your account, you will get a notification on your phone.

Luckily, Oracle included the Allow and Deny options directly into the notification, so you can make your choice without opening the app. I know other authenticators, that are not so smart (hello PayPal).
You can make use of this, if you have Smart Notifcations enabled at your Garmin watch and added the Oracle Authenticator to your allow list.1
When you get a Login Attempt message on your phone, that will also be mirrored to your watch. Notice the blue'ish mark on the upper right button, press it.
That will bring up the same choices as in the phone notification. So choose your option here and you are done.


Thursday, 20 March 2025

How to connect via ssh to Database from the Oracle SQL Developer Extension for VSCode

This post is inspired by a LinkedIn posting from Kris Rice, so kudos to him. Based on that, this post will show how to connect from your Windows host to a VirtualBox VM running Oracle Linux via ssh from the Oracle SQL Developer Extension for VSCode.

First check if the sshd in your VM is running

sudo systemctl status sshd

If you don't already have an ssh key pair on your Windows host, create one via ssh-keygen in the .ssh folder under your home directory

In your Linux VM add the public key from your Windows host by

sudo vi ~oracle/.ssh/authorized_keys

Paste your public key into that file and save it.
Test your connection from the Windows command line.

As you will not be able to choose a username when connecting from VSCode, create an ssh config file on Windows in your .shh folder like this:

Host 192.168.56.11
  User "oracle"
  IdentityFile c:\Users\Arne\.ssh\abruenin-lap

If you don't already have, install the Remote - SSH extension in VSCode
With that extension, you will get the Remote Explorer. It scans your .ssh config file and offers you the ssh hosts that it found.
Click the folder icon next to your connection to 'Connect in New Window...'

In the new server side window, VSCode will recommend you to install the old Oracle Developer Tools for VS Code, though these are marked as deprecated (at least my VSCode did that). Instead install the Oracle SQL Developer Extension for VSCode.
Once installed, you can use SQLDeveloper in the remote ssh window just as you would use it with a direct connection.


Wednesday, 10 July 2024

How to import Outlook Contact Groups into Thunderbird Mailing Lists

Importing Outlook contacts into the Thunderbird address book is quick and easy, but if you also want to transfer your contact groups into TB's mailing lists, there are some extra steps required. But if you have Contact Groups with thousands of entries, re-creating them im TB is probably not an option.

Start with any given Contact Group. Click File|Save As, choose Text Only (*.txt) as type and save that file to a location of your choice.

Start Excel and click Open|Browse
Open the exported file
In the import wizard, make sure to pick the correct character set. Scroll in the Preview region to check that the national character set is chosen correctly. For the rest we can go with the defaults, so just click Finish.
Double check, that everything has been imported correctly. Then mark all the header lines and delete them.
Click File|Save As, choose CSV UTF8 as output format and Save the file.
Move over to Thunderbird/Betterbird and on the Address Book tab click Import.
Go with the default .csv and Continue
Select your exported .csv and Open it.
Uncheck First row contains field names. In my case, the defaults for the address book fields are OK, but you might need to adjust the choice, then Continue.
I recommend to create a new directory. If something goes wrong, this is the easiest option to correct. ContinueStart Import and Finish
Now we have the Outlook Contact Group as new Address Book in Thunderbird.
To get a Thunderbird Mailing List from these contacts, mark all and click New List.
Fill out the fields if you like, the location for that Mailing List could also be your usual address book.
Here we are, your Outlook Contact Group imported as a Thunderbird Mailing List.


Friday, 7 June 2024

Running the Oracle 23ai Autonomous Database Free Container Image

 With the Oracle Database 23ai comes a new deployment option, the free Autonomous Database Free Container Image. It gives developers the option to develop with an Autonomous Database even when not connected to the internet, eg. when travelling. This post shows how to set it up on Oracle Linux 9.4, in my case it is running in a VirtualBox VM on my Windows desktop PC. For details, see the official documentation, this is only meant as a quick runthrough.

Following the documentation, start with

podman machine init 
podman machine set --cpus 4 --memory 8192 
podman machine start 

Maybe it is just my system, but when running podman machine init I get the error qemu-system-x86_64: executable file not found in $PATH. A post on forums.oracle.com described the following solution, which worked on my system:

sudo ln -s /usr/libexec/qemu-kvm /usr/bin/qemu-system-x86_64

The podman command should run now, so follow the steps from the documentation.

podman pull container-registry.oracle.com/database/adb-free:latest-23ai
podman images container-registry.oracle.com/database/adb-free:latest-23ai

That image should show up on your system:
It is important to choose a password which is compliant with the images policy "The ADMIN_PASSWORD must be between 12 and 30 characters long and must include at least one uppercase letter, one lowercase letter, and one numeric".
Choosing a too simple password results in a runtime error, check with podman logs adb-free.
Then start a container with that image, in my case an ATP instance. 

podman run -d \
-p 1521:1522 \
-p 1522:1522 \
-p 8443:8443 \
-p 27017:27017 \
-e WORKLOAD_TYPE='ATP' \
-e WALLET_PASSWORD=*** \
-e ADMIN_PASSWORD=*** \
--cap-add SYS_ADMIN \
--device /dev/fuse \
--name adb-free \
container-registry.oracle.com/database/adb-free:latest-23ai

If nothing went wrong, you should see the container running.
So let's try some stuff. First open Database Actions by browsing https://localhost:8443/ords/sql-developer (and accept the self signed certificate), login with admin and your super secure password from above.
Also APEX works ootb, just login again with your password from above.
To access the ADB from outside with your favorite tooling, copy the wallet from to image to a folder. For SQLDeveloper, we need it as a zip.

podman cp adb-free:/u01/app/oracle/wallets/tls_wallet ~/tls_wallet
zip adb-free-wallet.zip tls_wallet/*

Use that wallet zip file in your tool of choice, in my case VSCodium with the Oracle SQL Developer Extension for VSCode.
Welcome to the Oracle 23ai Autonomous Database Free Container Image.
As long as your podman is ready to run and you respect the password compliancy, this is setup within minutes.

Tuesday, 30 April 2024

Oracle on Windows: out-of-place Patching with Virtual Account

This guide shows a way, how a Gold Image can be created from an Oracle Home on Windows and how that can be used to patch other Oracle Homes. This worked for me, but is not meant to be the only, best or officially recommended Oracle way.

Prepare the image source home

Say we have an unpatched 19.3 installed in c:\oracle\product\19.0.0\dbhome_1 with a database ORCL (non-PDB), installed with the option to use a Virtual Account, which is the default from the Oracle installer.

So the owner for the Oracle software home and datafiles has been created as ORA_OraDB19Home1_SVCACCTS by the installer.
Next we set up a new Oracle home and patch it, to make it the source of our gold image in c:\oracle\product\19.0.0\dbhome_2.

There is no standard oraenv.sh under Windows. As some tasks have to be done from the old and some from the new home, it helps to create two different oraenv scripts, eg. old-oraenv.cmd and new-oraenv.cmd , like in my environment:

old-oraenv.cmd

set ORACLE_BASE=C:\Oracle
set ORACLE_HOME=%ORACLE_BASE%\Product\19.0.0\dbhome_1
set PATH=%ORACLE_HOME%\bin;%PATH%
set PATH=%ORACLE_HOME%\perl\bin;%PATH%
set PATH=%ORACLE_HOME%\OPatch\;%PATH%
set PATH=%ORACLE_HOME%\jdk\bin\;%PATH%

new-oraenv.cmd

set ORACLE_BASE=C:\Oracle
set OLDORA_HOME=%ORACLE_BASE%\Product\19.0.0\dbhome_1
set ORACLE_HOME=%ORACLE_BASE%\Product\19.21\dbhome_3
set PATH=%ORACLE_HOME%\bin;%PATH%
set PATH=%ORACLE_HOME%\perl\bin;%PATH%
set PATH=%ORACLE_HOME%\OPatch\;%PATH%
set PATH=%ORACLE_HOME%\jdk\bin\;%PATH%

Run your oraenv.cmd, unpack the software (you can use tar xfz under Windows for unzip) and run setup.bat, see the Database Installation Guide 19c for Microsoft Windows

C:\app>oraenv.cmd
C:\app>mkdir %ORACLE_HOME%
C:\app>cd %ORACLE_HOME%
C:\app\oracle\product\19.0.0\dbhome_2>tar xfz z:\Install\Windows\WINDOWS.X64_193000_db_home.zip
C:\app\oracle\product\19.0.0\dbhome_2>setup.bat 

We only need to setup the software only and this is a single instance installation. Under Linux, we would just apply the RU and one-offs from the setup, but the options '-applyRU 'and '-applyOneOffs' are not available under Windows (see the comments on https://mikedietrichde.com/2022/05/17/simple-database-installation-with-applyru-and-applyoneoffs/, search for Windows).

Update opatch by following Doc ID 274526.1 from Oracle Support, in this case using opatch 12.2.0.1.41.

For the Gold Image, we will patch the 19.3 dbhome_2 up to 19.21 plus two one-off patches for the JVM. So download and unpack the patches to a given directory, in this example c:\app\oracle\patches. The patch numbers are 35638318, 35648110 and 35681552, these have to be applied manually by running opatch apply in every patch directory, starting with 35681552 which is the Bundle Patch 19.21.

Now the dbhome_2 is on 19.21 with two additional one-off patches and will serve as source for our Gold Image.

Create the Gold Image

Next, from the patched Oracle Home, we create a Gold Image following the documentation.

setup.exe -createGoldImage -destinationLocation c:\oracle\images 

Wait for the installer to finish, then you should have the newly created image in the directory stated by -destinationLocation. The dbhome_2 can be deleted with Oracle's deinstall program.

Out-of-place patching using the Gold Image

We now have an unpatched Oracle 19.3 home in dbhome_1 with the database ORCL and a gold image with version version 19.21 and two one-off patches.

For out-of-place patching, we need to create a new Oracle Home, where we unpack the Gold Image. 

C:\app>new-oraenv.cmd
C:\app>mkdir %ORACLE_HOME%
C:\app>cd %ORACLE_HOME%
C:\app\oracle\product\19.21\dbhome_3>tar xfz c:\app\oracle\images\db_home_2024-02-21_05-21-14PM.zip
C:\app\oracle\product\19.21\dbhome_3>setup

Run setup, choose software only and accept the default virtual account. If setup.exe crashes with a Java EXCEPTION_ACCESS_VIOLATION, follow MOS note 2772729.1.

rem --- Copy spfile and pwdfile to new ORACLE_HOME
copy %OLDORA_HOME%\database\SPFILEORCL.ORA %ORACLE_HOME%\database
copy %OLDORA_HOME%\database\PWDorcl.ora    %ORACLE_HOME%\database

Shutdown the database first, then copy the spfile and pwdfile to the new dbhome_3
The setup has created a new user ORA_OraDB19Home2_SVCACCTS and granted full control for the oradata directory, so the Oracle software from the new dbhome_2 can take over the files from the old dbhome_1.
On Unix/Linux systems, we would already be done, but on Windows we have services which need to be migrated to the new Oracle Home.
In the registry, we see that some services are linked to a given Oracle Home, so these need to be recreated.

set OLDORA_HOME=%ORACLE_BASE%\product\19.0.0\dbhome_1

rem --- use oradim to delete Oracle services ---
oradim -DELETE -SID orcl

For easier scripting, we point OLDORA_HOME to the Oracle home running the old version.
First delete the instance services with oradim, which will remove OracleServiceORCL, OracleVssWriterORCL and OracleJobSchedulerORCL. 
The Oracle Home specific services will remain. These will be deleted, when deleting the dbhome_1. 

rem --- stop remaining Oracle services ---
sc stop OracleOraDB19Home1MTSRecoveryService
sc config OracleOraDB19Home1MTSRecoveryService start= disabled
sc stop OracleOraDB19Home1TNSListener
sc config OracleOraDB19Home1TNSListener start=disabled

But as one advantage of out-of-place patching is, that you can go back to the old version, you probably want to keep them for some time, so we will just disable them.
The remaining services should now be stopped and disabled.

rem --- create new services for new Oracle home
oradim -NEW -SID orcl -STARTMODE auto -SRVCSTART system -SPFILE -PFILE %ORACLE_HOME%\database\SPFILEORCL.ORA

Then use oradim again to create the instance specific services
It recreates the OracleServiceorcl, OracleVssWriterorcl and OracleJobSchedulerorcl for the new Oracle home.
Double checking from the Registry, that we are now running on the patched dbhome_3
Also from SQLPlus, everything looks fine.

rem --- recreate remaining services
%ORACLE_HOME%\bin\oramtsctl -new
%ORACLE_HOME%\bin\lsnrctl start
sc config "OracleOraDB19Home3TNSListener" start= auto

The formerly disabled services from the old home need to be recreated for the new home. Starting the Listener automatically creates a new Service for the new home. That should be configured to start automatically.

Now we have migrated all services to the new Oracle home.

rem --- start the database and run datapatch
rem --- not needed with service auto start --- @echo startup | sqlplus / as sysdba
rem --- @echo alter pluggable database all open | sqlplus / as sysdba
rem --- @echo show pdbs | sqlplus / as sysdba
@echo @?/rdbms/admin/utlrp.sql | sqlplus / as sysdba
%ORACLE_HOME%\OPatch\datapatch

Before running the datapatch, make sure that all pds are open if already running on Mutlitenant architecture. When the open state has been saved by using ALTER PLUGGABLE DATABASE ... SAVE STATE, that step can be skipped. Here we open all PDB's before running the datapatch 
The database software and data dictionary should now be on the new version.

rem --- apply optimizer fixes for every PDB
@echo @?/rdbms/admin/dbmsoptim.sql | sqlplus / as sysdba
@echo @?/rdbms/admin/prvtoptim.plb | sqlplus / as sysdba
@echo execute dbms_optim_bundle.enable_optim_fixes('ON','BOTH', 'YES'); | sqlplus / as sysdba

Last step is enabling the optimizer fixes for the new version. That's it, we are running on 19.21 after out-of-place patching.
Finally, after some time, you might want to delete the old 19.3 Oracle home dbhome_1. Run %ORACLE_HOME%\deinstall\deinstall.bat to clean up the old installation.
After the deinstallation of the old home, only the patched 19.21 services from dbhome_3 will remain.

The complete scripting can be found on GitLab.