Monday, 22 September 2025

Use Oracle Autonomous Database SELECT AI feature with Mistral.ai

This Blog post shows how to use the Oracle 23ai SELECT SQL feature with Mistral.ai. Based on the blog-post Announcing Additional AI Providers for Oracle Autonomous Database Select AI, my colleague Michal Soszynski and me did some testing.

Let's do some preparations first. To work with the Mistral.ai API you need an API key, which requires an account and a subscription. For running a few tests, their free subscription is sufficient. 

To get the name of their actual model, just ask Mistral: what is the exact name of your model for use in API calls?

So it is mistral-large-latest. Now let us ask for the API endpoint: and what is the endpoint to use this model via api calls?
So it is https://api.mistral.ai/v1, we now have our basic parameters. In my case, Mistrala also offers a curl command to test the API, run it to check if your API key is valid

curl -X POST https://api.mistral.ai/v1/chat/completions \
  -H "Content-Type: application/json" \
  -H "Authorization: Bearer YOUR_MISTRAL_API_KEY" \
  -d '{
    "model": "mistral-large-latest",
    "messages": [
      {"role": "user", "content": "Hello, how are you?"}
    ]
  }'

As sys grant the execution right to your user:

grant EXECUTE on C##CLOUD$SERVICE.DBMS_CLOUD to scott;
grant EXECUTE on C##CLOUD$SERVICE.DBMS_CLOUD_AI to scott;

Also allow network access with an ACL

BEGIN
 DBMS_NETWORK_ACL_ADMIN.APPEND_HOST_ACE(
    host => 'api.mistral.ai',
    ace  => xs$ace_type(privilege_list => xs$name_list('http'),
                principal_name => 'SCOTT',
                principal_type => xs_acl.ptype_db));
END;

Continue as your user, create a credential for access to Mistral.

BEGIN
  DBMS_CLOUD.create_credential(
    credential_name => 'MISTRAL_CRED',
    username    => 'YOUR_MISTRAL_USERNAME',
    password    => 'YOUR_MISTRAL_API_KEY');
END; 

Give your user a few tables to test with, like Employees and Departmens from the HR demo schema or use whatever you have. Then create a profile for Mistral.AI, which is OpenAI compatible. But as it is compatible, but it is not OpenAI, we need the to extra parameters model and provider_endpoint. Luckily, we already asked Mistral.ai for them so we can use them in our create_profile call.

BEGIN
  DBMS_CLOUD_AI.create_profile(
    'MISTRAL',
    '{"credential_name": "MISTRAL_CRED",
      "provider": "openai",
      "object_list": [
        {"owner": "SCOTT", "name": "EMPLOYEES"},
        {"owner": "SCOTT", "name": "DEPARTMENTS"}      ],
      "model" : "mistral-large-2407",
      "provider_endpoint" : "api.mistral.ai/v1/chat"}'
    );
END;

Enable that profile for use with SELECT AI

EXEC DBMS_CLOUD_AI.set_profile('MISTRAL');

That’s it, start playing and don’t be ashamed of typos, eg. 

select ai how many employees ae working per derpartment;
select ai showsql how many employees ae working per derpartment;

Or try something in your language:

select ai welcher beruf verdient im Schnitt am wenigsten;

Have fun!


Tuesday, 13 May 2025

Setup Oracle Base Database Service in OCI

 This is the first step in my The Oracle Database Developer OCI Environment series We begin with setting up the required networking, then the Base Database Service and test the connection.

Create a Virtual Compute Network (VCN)

Navigate to Networking|Virtual Cloud Networks.


In Networking|Virtual Cloud Networks choose Actions|Start VCN Wizard

Select Create VCN with Internet Connectivity and Start VCN Wizard.

As long as you don’t need something else, mostly go with the defaults. Give it a name, choose your compartment and a CIDR block. 

The public and private subnet address ranges derived from the VCN range should be fine, click Next.
Double check, click Create and View VCN.

Go to the Security tab and click on the Default Security List to edit it.

Go to the Security rules tab and select Add Ingress Rules.

Select your Source CIDR and enter 1521 for the Destination Port Range. Important: leave the Source Port Range empty. Give it a name and finish

The new rule should appear in the list and should look like the one for SSH, except for the name and port.

Create Database Base service

Navigate to Oracle Database|Oracle Base Database Service.

Click on Create DB system.

For most settings, I go with the defaults but YMMV, so adapt the settings to your needs.

Give it a name, the compartment should be pre-selected. Adapt the shape and Edition to your like.

Upload your existing SSH public key or let OCI create you a new key pair. When you download a new key pair, save it to the .ssh folder in your home directory (any OS), for example on my Windows desktop it is 

C:\Users\Arne\.ssh

Choose your preferred license type.


Select the newly created VCN and subnet. We use the public subnet to have SQLNet access via the internet, equivalent to what we would have with a shared Autonomous Database. For a production environment, you should consider creating the database in a private subnet. Enter a hostname prefix

Change the database name, if you don’t like the auto generated one.

As you probably want to use 23ai, click on Change database image.

When you switch on Display all available versions, you will see that 23.7. is the latest image at the time of writing, though 23.8. is already out. Take this image, we will upgrade it later.

Name the PDB and enter your new password. Disable b ackups, if you don’t need them. Then click on Create.

To watch the progress, click on Work requests.

When finished, switch to the Nodes tab and note down the public IP address.

Connect to instance and check database

Connect via ssh

When you have more than one ssh key pair in your .ssh directory, create a config file to assign the keys to different servers. Create or edit your ~/.ssh/config file and add a new entry like this:

Host <your-public-IP-address>
  User "opc"
  IdentityFile c:\Users\<your-user-name>\.ssh\ssh-key-2025-04-23.key

eg.

Replace ssh-key-2025-04-23.key with your key file name.

Next connect to your instance via ssh by running:

ssh opc@<your-public-IP-address>


You should immediately be connected to your virtual machine as user opc. Change user to oracle.
If you get prompted for a password when running the ssh command, most probably something is wrong with your files in the .ssh folder. Double check key pair and config files.

First connect to the database

As user oracle take a first look at your database:

Check the listener first, should look good.

Do a direct connect to the database: sql / as sysdba

Take a look at your PDB’s: sho pdbs

SQLNet connect to your database

Next lets check SQLNet connect.

To find the SQLNet connection information, go to the Databases tab and click on your database.

Click on the DB connection button.

Note down the Easy Connect string for the CDB.

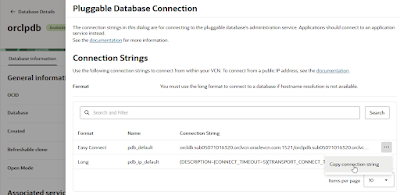
Navigate to Pluggable Database und select your PDB.

Also note down the connect string for the PDB.

From the ssh session connect to the CDB via 

sql system/<password>@<quick-connect-string>


So the database is up and running and we have access via SQLNet.


Monday, 12 May 2025

The Oracle Database Developer OCI Environment

This is a step-by-step guide for setting up an Oracle Database Development Environment on OCI. It will use the Base Database Service instead of an Autonomous Database, so an OCI account where a DB Base Service can be set up is required. In addition to the database, all necessary tools like ORDS and APEX will be set up, similar to my 'The Oracle Database Developer VM Project' series. And same as my older series, this is a work-in-progress, continuously updates when I find something new to cover.

Thursday, 8 May 2025

Use your Oracle Athenticator on Android via your Garmin smartwatch

In fact, this is a generic feature of the Garmin integration with Android smartphones. If you use the Oracle Authenticator to log into your Oracle Cloud account, you can use your Android smartphone for two-factor authentication. When logging into your account, you will get a notification on your phone.

Luckily, Oracle included the Allow and Deny options directly into the notification, so you can make your choice without opening the app. I know other authenticators, that are not so smart (hello PayPal).
You can make use of this, if you have Smart Notifcations enabled at your Garmin watch and added the Oracle Authenticator to your allow list.1
When you get a Login Attempt message on your phone, that will also be mirrored to your watch. Notice the blue'ish mark on the upper right button, press it.
That will bring up the same choices as in the phone notification. So choose your option here and you are done.


Thursday, 20 March 2025

How to connect via ssh to Database from the Oracle SQL Developer Extension for VSCode

This post is inspired by a LinkedIn posting from Kris Rice, so kudos to him. Based on that, this post will show how to connect from your Windows host to a VirtualBox VM running Oracle Linux via ssh from the Oracle SQL Developer Extension for VSCode.

First check if the sshd in your VM is running

sudo systemctl status sshd

If you don't already have an ssh key pair on your Windows host, create one via ssh-keygen in the .ssh folder under your home directory

In your Linux VM add the public key from your Windows host by

sudo vi ~oracle/.ssh/authorized_keys

Paste your public key into that file and save it.
Test your connection from the Windows command line.

As you will not be able to choose a username when connecting from VSCode, create an ssh config file on Windows in your .shh folder like this:

Host 192.168.56.11
  User "oracle"
  IdentityFile c:\Users\Arne\.ssh\abruenin-lap

If you don't already have, install the Remote - SSH extension in VSCode
With that extension, you will get the Remote Explorer. It scans your .ssh config file and offers you the ssh hosts that it found.
Click the folder icon next to your connection to 'Connect in New Window...'

In the new server side window, VSCode will recommend you to install the old Oracle Developer Tools for VS Code, though these are marked as deprecated (at least my VSCode did that). Instead install the Oracle SQL Developer Extension for VSCode.
Once installed, you can use SQLDeveloper in the remote ssh window just as you would use it with a direct connection.